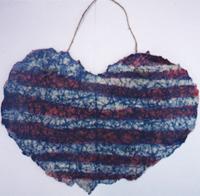
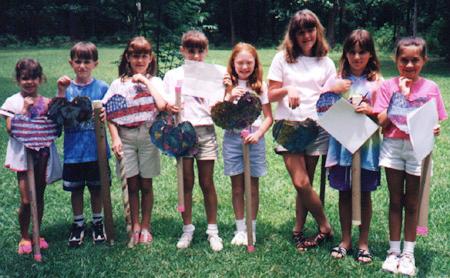
 Everyone likes to decorate their front door on the holidays, and the 4th
of July is no exception. Here's an idea that is easy to make with materials
you may already have on hand. This is an example of what your project could
look like:
Everyone likes to decorate their front door on the holidays, and the 4th
of July is no exception. Here's an idea that is easy to make with materials
you may already have on hand. This is an example of what your project could
look like:
Everyone likes to decorate their front door on the holidays, and the 4th
of July is no exception. Here's an idea that is easy to make with materials
you may already have on hand. This is an example of what your project could
look like:
This door decoration is the work of Courtney MacIlvane, age 7.
This work is an example of batik, an oriental technique of dying a fabric or paper with a wax resist process. If you'd like to make one like it, first gather the materials listed below:
| Materials List | |
|---|---|
|
|
| Optional: clear Christmas lights, buttons, beads, and a hot glue gun | |
1. Cut the largest side from the grocery bag--the one largest
rectangle.
2. Set the rectangular shape with the longest side running from
left to right. Fold the rectangular shape in half from left to right.
*At this point choose a heart or a square design for your project.
3. Draw 1/2 of a heart on the fold, just like you do on Valentine's
day. Make the heart as big as you can, using the entire paper. The heart
will look plump.
4. Draw a dot 1 1/2" below the upper curve of the folded heart.
With your pencil, poke a hole in the paper all the way through to the other
fold. These dots will be your markers for threading your string through
later, when you want to make a hanger for your finished paper batik.
5. Cut out the heart shape with a scissors, or simply rip around
the pencil line to create a more hand-crafted look.
3. Measure the height of the folded rectangle with a ruler.
4. Divide the number of inches by 2 and that number will be the
# of inches you measure from the fold outward. Mark that number of inches
from the bottom of the fold inward, and from the top of the fold inward.
Mark your paper on the bottom and top of your folded paper, and then use
a ruler to join the two marks. You may now cut the folded paper on the
line with a scissors. Be careful to hold the paper together as you cut
so that the shape will come out perfectly square.
5. Using a pencil, mark the upper right hand corner 1 1/2"
to the left of the corner, and then draw a line straight down 1 1/2".
Then mark 1 1/2" down from the same corner and draw a line to the
left of the mark 1 1/2". Where the two lines meet make a dot. Poke
the point of a pencil through the dot to the other side of the folded paper.
This will be the spot you thread your string through to make the hanger
for your project.
6. Fold the paper in half one more time from top to bottom, so you
have a small folded square. Firmly press the folds with your fingernails.
This will help you divide your design into 4 equal squares. Each small
square can be designed differently, like a quilt. Using vertical stripes,
and then horizontal stripes can create an interesting design. You may choose
to place a star design in several squares for balance, or maybe one large
star in the center of all four squares. The choices are endless. You might
consider designs such as a black and white checkerboard, and cherries with
the option of a green crayon for the leaves. The inspiration here would
be George Washington chopping down his father's cherry tree. A log cabin
quilt pattern can be a great way to use simple blocks of color for the
design, with a single star or an added button glued on as a focal point.
Once you have drawn your design with pencil on your paper shape, you may
begin the batik process of the project.
1. Plan the white star or lighter colors so that they are not
next to any other white or lighter colored shapes.
2. Lay out a piece of newspaper to keep your table clean. Do all
your steps for batik with the newspaper underneath your project.
3. Press HARD when coloring your design. Every space on your paper
will be completely covered with thick crayon wax.
4. The white areas should be colored twice, to make sure they cover
the paper.
5. Slowly crumple your design into a ball. Squeeze it tightly. Open
the paper ball, and flatten the paper, and then roll it into another ball,
changing the way it is crumbled the second time.
6. Lay your paper flat, pressing it out with the palm of your hand.
7. With a paintbrush or sponge, paint your paper with a thin mixture
of deep blue water color paint and water. Heavy paint will not seep into
the cracks to create the crackle effect. The wax areas (those heavily crayoned)
resist the paint and the cracked wax areas accept the paint making the
desired crackle effect.
8. Once the paint has seeped into the cracks, blot the top of the
paper with a paper towel to remove any excess paint sitting on top of the
heavily crayoned design.
9. Allow the paper to dry completely. Usually wax is removed by
ironing the batik with paper blotters. This technique does not work with
this project. Once the paper has dried completely, carefully scrape the
wax from the paper with a plastic knife. A parent will need to help you
with this part of the project. When you scrape the wax layer off, you will
find that the paper has accepted the crayon color, and that the crackle
effect is much more visible than before.
10. Ask your parent to cut a piece of cardboard just a little smaller
than your finished paper design.
11. Spread rubber cement on the cardboard and carefully press the
finished paper batik onto the cardboard backing. Make sure the design covers
the cardboard backing.
12. Cut a 25" piece of heavy string, preferably jute or several
strands of raffia.
13. Find the spots that you marked before with the tip of your pencil.
14. Now poke the pencil from the marked holes all the way through
to the back of the cardboard backing. 15. Thread the string through
the holes from the back to the front of the design. Use the eraser end
of the pencil to help force the opposite ends through the holes.
16. Adjust the string hanger to the desired length and then knot
the strings in the front of each hole, leaving about 3" hanging down
from the large knot. .
17. Unravel the 3" ends of string and add optional beads to
each of the unraveled strings if desired. Now hang your paper batik on
your front door and celebrate in style!
18. Optional: For night time glitz--add lights to your project.
Poke holes in the design with a pencil around the edges or around just
the large star design, for example. Use clear Christmas lights but your
parent(s) will have to do this part so that you will be unharmed and so
that you the lights will stay intact as they slide through the holes in
the cardboard.
19. Option #2: Add buttons with a glue-gun,(Parents will need to
supervise the hot glue gun) or add streaks of glow in the dark crayons
for fun. (Glow in the dark crayons will not work for the entire batik as
they do not have enough wax content to get the desired crackle effect.)
20. Have a safe and happy 4th of July!
|
| (573) 470-5806 | spiritguidedhealer@gmail.com |
Home | Reiki Healing | Herbs | Articles |
SouthernPRIDE
| Links